The most profitable tillage system isn’t a one-size-fits-all method, but a tailored approach based on diagnosing your specific soil conditions and operational goals.
- Heavy clay soils can cause yield penalties in no-till systems, while sandy or loamy soils may see faster benefits.
- Deep soil compaction is often caused by heavy axle loads (over 10 tons) and its yield-robbing effects can last for more than a decade.
Recommendation: Before changing your tillage practice, dig a soil pit to diagnose hardpans, assess soil structure, and understand the real problem you need to solve.
The debate between no-till and conventional tillage often feels like a choice between two opposing philosophies. On one side, advocates praise no-till for its ability to save fuel, reduce erosion, and build soil organic matter. On the other, conventional tillage remains a trusted method for creating a clean seedbed and managing tough residues. For farmers weighing the costs of diesel against the long-term health of their land, the decision is rarely straightforward. The conversation often overlooks the vast middle ground of minimum tillage, strip-till, and vertical tillage systems.
The common advice to “just switch to no-till” ignores critical variables like soil type, climate, and existing compaction issues. The real key to a successful and profitable tillage strategy doesn’t lie in blindly adopting a dogma, but in becoming a diagnostician of your own fields. The core issue might not be the tillage method itself, but a hidden hardpan, poor soil aggregate stability, or the crushing weight of modern machinery. This is where the concept of a “tillage spectrum” becomes crucial—viewing different implements not as good or bad, but as specific tools for specific jobs.
This guide moves beyond the binary choice. Instead of prescribing a single solution, it provides a framework for analyzing your unique situation. We will explore the specific conditions where no-till can fail, how to precisely set up alternative systems like strip-till, and how to identify the hidden yield barriers like deep compaction. By understanding the underlying mechanics of soil-machine interaction, you can make an informed decision that truly fits your farm’s soil, crops, and economic reality.
To help you visualize the results of a long-term commitment to soil health, the following video showcases a “smoke test” experiment, demonstrating the remarkable porosity and health of soil under continuous no-till and cover crop management.
This article is structured to walk you through the critical diagnostic questions and comparative data you need. Explore the sections below to pinpoint the factors most relevant to your operation and build a tillage strategy that works for you.
Summary: A Diagnostic Guide to Choosing Your Tillage System
- Why Switching to No-Till Fails on Heavy Clay Soils?
- How to Set Up Strip-Till Rigs for Perfect Seedbeds?
- Vertical Tillage or Disc Ripping: Which Manages Residue Better?
- The Axle Load Mistake That Compacts Soil Below the Plow Layer
- When is Soil Too Wet to Till Without Causing Smearing?
- The Tillage Habit That Destroys Soil Aggregates in 3 Seasons
- Why Frequent Harrowing Destroys Soil Aggregates?
- How to Diagnose Hardpans That Limit Root Penetration?
Why Switching to No-Till Fails on Heavy Clay Soils?
The promise of no-till farming—improved soil health, water retention, and reduced costs—is compelling. However, a blind transition without considering soil type can lead to disappointment and significant yield penalties, especially on fields with high clay content. Heavy, poorly-drained soils are slower to warm up and dry out in the spring. Without tillage to aerate and break up the surface, these soils can remain cold and wet, delaying planting and hindering early-season root growth. This is a primary reason why a direct switch to no-till can fail.
Research confirms this soil-dependent performance. While no-till can succeed, it often requires a longer and more challenging transition period on finer-textured soils. For example, long-term research from 30 years of Michigan State studies shows that while soybean yields eventually surpassed conventional tillage after eight years in a no-till system, it took corn a full 16 years to see the same positive divergence on loamy soils. The challenge is even greater in colder regions with higher clay or organic matter content, which are more prone to yield declines under no-till.
The core issue is the interaction between soil structure, water, and temperature. Clay soils have smaller pores, which can become waterlogged without the mechanical fracturing provided by tillage. This creates an anaerobic environment that suppresses microbial activity and nutrient availability. In contrast, coarser, sandier soils with better internal drainage often see faster benefits from no-till because their structure is naturally more resilient to compaction and they warm up more quickly. Understanding your soil’s texture is the first diagnostic step in determining if a pure no-till system is a viable immediate goal, or if a more gradual approach with minimum tillage is a wiser path.
How to Set Up Strip-Till Rigs for Perfect Seedbeds?
For farmers dealing with heavy residue or challenging clay soils, strip-tillage offers a powerful middle ground between conventional and no-till systems. It combines the soil-warming and seedbed preparation benefits of tillage with the soil conservation advantages of no-till by tilling only a narrow band where the seed will be planted. However, success is not guaranteed by the implement alone; it depends entirely on precise setup and operation. The goal is to create a consistent, mellow, and uniform planting zone while leaving the majority of the field undisturbed.
A properly configured strip-till rig should create a firm, smooth seedbed, not an overly fluffy one that can lead to air pockets and poor seed-to-soil contact. Using RTK guidance is critical for creating consistent 6-inch-wide channels that allow roots to grow straight down without obstruction. This precision also enables the banding of 100% of nutrients directly into the root zone, dramatically improving fertilizer efficiency compared to broadcasting. Key adjustments like coulter depth and row cleaner aggression must be adapted based on real-time soil moisture, not just a static soil map. The choice between performing strip-till in the fall or spring also dictates the setup, as their primary goals are different.
The following table, adapted from strip-till best practices, outlines the key differences in setup requirements for fall versus spring applications.
| Setup Parameter | Fall Strip-Till | Spring Strip-Till |
|---|---|---|
| Primary Goal | Build resilient berms that settle over winter | Create ‘just-in-time’ seedbed |
| Depth Target | 8-11 inches for freeze-thaw action | 4-6 inches for quick warming |
| Speed | 4-6 mph for proper berm formation | 6-8 mph possible with strip fresheners |
| Nutrient Placement | P and K deep with N stabilizer | Starter fertilizers in upper zone |
| Residue Management | More aggressive to handle fresh stalks | Lighter touch on decomposed residue |
Vertical Tillage or Disc Ripping: Which Manages Residue Better?
Once you decide some level of tillage is necessary, particularly for managing heavy crop residue, the “tillage spectrum” offers a range of tools with very different impacts. Two common choices are vertical tillage (VT) and disc ripping, and selecting the right one depends entirely on your primary goal. Is it to size and pin residue to the surface for erosion control, or to bury and mix it for rapid decomposition? The answer determines not only your equipment choice but also the long-term impact on your soil’s biological ecosystem.
Vertical tillage tools are designed to run at shallower depths and higher speeds, using straight or slightly fluted coulters to cut and size residue while causing minimal horizontal soil shearing. This approach is excellent for pinning residue to the surface, which protects against wind and water erosion. Crucially, it helps preserve the fungal hyphae networks and soil aggregates that are vital for long-term soil structure. In contrast, disc ripping is a more aggressive action. The concave blades of a disc are designed to invert and mix soil, burying a high percentage of residue. This favors a bacterial-dominant soil environment that can break down residue quickly but comes at the cost of destroying soil aggregates and increasing the risk of erosion and compaction.
As fourth-generation farmer Matt Moreland notes, the economic and environmental calculus often favors less aggressive methods:
When you’re in a tilling situation, all you do all summer is buy diesel and burn diesel. No-till works because the economics of it works and the environmental part works.
– Matt Moreland, Fourth-generation farmer using no-till methods
This decision matrix clarifies the trade-offs:
| Factor | Vertical Tillage | Disc Ripping |
|---|---|---|
| Primary Purpose | Size & Pin residue for erosion control | Bury & Mix for rapid decomposition |
| Soil Biology Impact | Preserves fungal hyphae and aggregates | Favors bacterial-dominant soil |
| Speed Range | 4.5-7 mph depending on blade type | 4-5 mph for proper mixing |
| Fuel Consumption | Lower – lighter pass required | Higher – more aggressive action |
| Long-term Soil Structure | Maintains aggregate stability | Higher destruction of soil structure |
The Axle Load Mistake That Compacts Soil Below the Plow Layer
The conversation about tillage often focuses on the implement itself, but one of the most destructive forces in modern agriculture operates above the ground: machinery weight. Specifically, high axle loads create deep, persistent compaction far below the typical tillage depth. This “subsoil compaction” is insidious because it cannot be fixed with a standard plow or disc pass, yet it severely restricts root growth, water infiltration, and ultimately, yield potential. The critical mistake is underestimating the impact of heavy grain carts, combines, and manure tankers during harvest or application, when soils are often most vulnerable.
The science is clear on the threshold for damage. While surface compaction can be managed, 10-ton axle loads almost always cause deep subsoil compaction beyond a 20-inch depth. This creates a dense, restrictive layer that acts like a concrete barrier to plant roots. The pressure bulbs from heavy equipment, as illustrated below, extend far deeper into the soil profile than many operators realize. This problem is compounded by the fact that its effects are incredibly long-lasting.
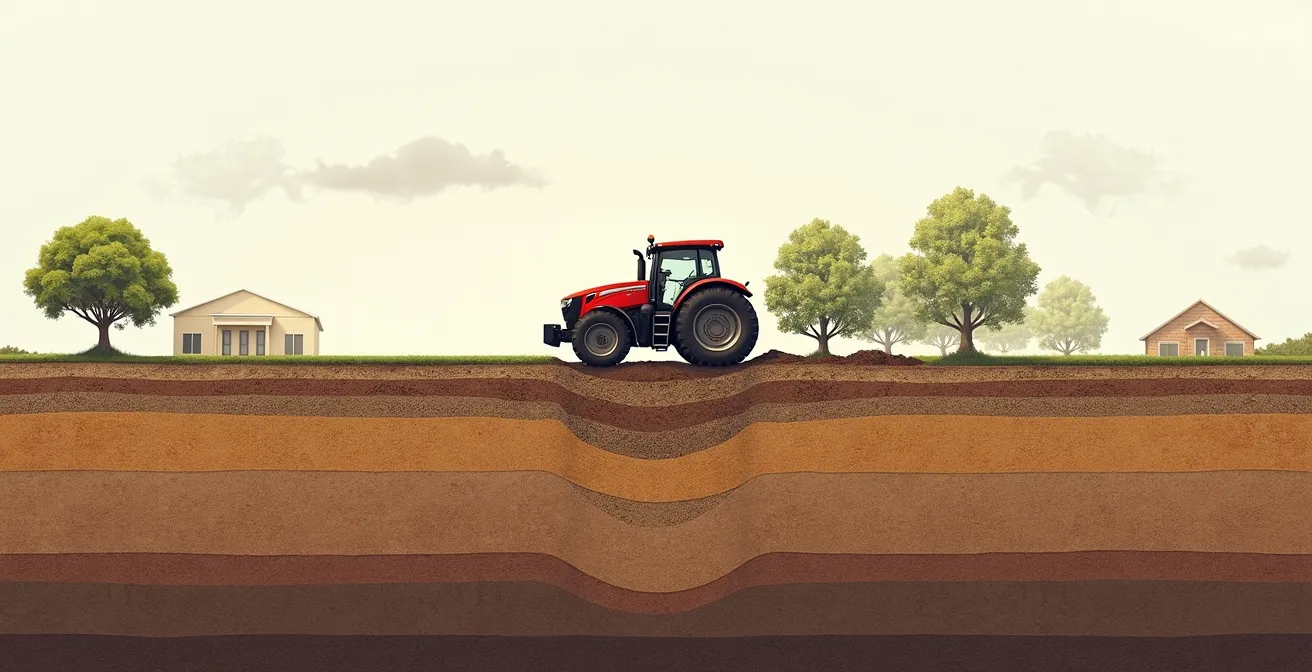
A landmark Ohio State University study provides a sobering example of this longevity. Researchers intentionally compacted plots for three years with a 20-ton axle load, then farmed the land without creating any new compaction for 16 years. The results were staggering: the initial compaction event still caused an 18% yield loss in both corn and soybeans over a decade and a half later. Even after subsoiling, yields in the compacted plots remained 10% below the control plots, proving that deep compaction is a legacy issue that is extremely difficult and costly to reverse. This highlights the importance of managing total axle load as a core part of any soil management strategy, regardless of the tillage system used.
When is Soil Too Wet to Till Without Causing Smearing?
One of the most damaging and common errors in farming is working ground when it’s too wet. The pressure of getting a crop planted can tempt operators into the field under marginal conditions, but the consequences—smearing, sidewall compaction, and destruction of soil structure—can plague yields for years. Tilling wet soil doesn’t create a friable seedbed; it creates a plasticized, low-oxygen environment where soil particles are pressed together, destroying the pore spaces needed for air and water movement. This damage is far more severe than surface compaction and can create a tillage pan that is difficult to break up.
As experts from Precision Inflation LLC state bluntly, the best advice is often the simplest: “If the field is too wet, stay out. If you go into a marginal field, understand you will be damaging your valuable soil and taking a yield hit for several years.” But how do you know when “too wet” is truly too wet? Relying on surface appearance is deceptive. The soil must be assessed at the actual depth of tillage. Fortunately, there are several reliable, in-field tests that any operator can perform to make an objective decision and avoid a costly mistake.
Your Action Plan: Field Tests for Tillage Readiness
- Perform the Ribbon Test: Take a handful of soil from your target tillage depth and try to roll it between your thumb and forefinger. If it forms a continuous, unbroken ribbon over 3-5 inches long, the soil has too much moisture and plasticit for tillage.
- Try the Ball Test: Squeeze a handful of soil firmly in your fist. If water drips out, it’s obviously too wet. If no water drips but the soil forms a stable ball that holds its shape when you drop it from waist height, it is still too wet to work without causing compaction.
- Use a Soil Probe: For a more objective measure, use a soil moisture probe to get data at multiple depths across the field. This helps you understand the moisture profile, not just the surface condition.
- Check at Tillage Depth: Always conduct your tests at the depth you plan to run your tillage tool. The surface might seem dry and ready, but the zone you intend to fracture could be saturated and prone to smearing.
- Test Multiple Locations: Soil moisture can vary significantly across a single field due to differences in soil type, topography, and drainage. Test in several representative locations, including low spots and knolls, to get a complete picture.
The Tillage Habit That Destroys Soil Aggregates in 3 Seasons
Soil structure is not permanent. It is a fragile ecosystem built over years through the work of roots, microbes, and fungi, which bind soil particles together into stable aggregates. These aggregates are the foundation of healthy soil, creating the pore spaces that allow for water infiltration, gas exchange, and unrestricted root growth. However, this hard-won structure can be destroyed with shocking speed by a single, ill-advised habit: aggressive, full-width tillage on fragile or long-term no-till soils.
The destructive power of this action is not theoretical. A revealing study from the Kellogg Biological Station (KBS) at Michigan State University demonstrated this fragility in stark terms. Researchers found that a single pass of a moldboard plow on soil that had never been farmed before instantly degraded its structure. The amount of soil aggregation was reduced to levels found on adjacent fields that had been conventionally tilled for over 50 years. In one pass, five decades of natural soil building were effectively erased.
This happens because aggressive tillage, especially with implements that invert the soil like a moldboard plow, shatters the aggregates and obliterates the delicate networks of fungal hyphae that hold them together. It exposes protected organic matter to rapid oxidation, releasing carbon into the atmosphere and diminishing the soil’s “glue.” While a single event is catastrophic, repeating this habit over just a few seasons ensures the complete collapse of the soil’s natural architecture, leading to crusting, increased erosion, and a greater dependency on mechanical intervention to create a seedbed. This creates a vicious cycle where tillage is used to fix the problems created by previous tillage passes.
Why Frequent Harrowing Destroys Soil Aggregates?
While a moldboard plow represents an extreme example of soil disturbance, a more common and deceptively destructive practice is the final, “finishing” pass with a harrow. Often seen as a necessary step to create a perfectly smooth, “garden-like” seedbed, frequent harrowing is a primary culprit in the destruction of soil aggregates at the surface. The high-speed, vibrating action of harrow tines pulverizes soil aggregates into fine dust particles. While this may look good on the surface, it sets the stage for disaster.
When the first heavy rain falls on this finely pulverized soil, the particles easily go into suspension and then settle to form an impermeable crust as the surface dries. This soil crusting prevents water infiltration, leading to increased runoff and erosion. It also presents a physical barrier that emerging seedlings struggle to break through, resulting in poor stands and uneven growth. The very action taken to “perfect” the seedbed ends up destroying its most important quality: stability. In fact, 19 years of collaborative tillage studies revealed that the top inch of no-till soil, with its intact aggregates, is two to seven times less vulnerable to erosion than conventionally plowed and harrowed soil.
The good news is that modern equipment and systems offer numerous ways to eliminate this destructive final pass. The goal is to achieve a quality seedbed in a single pass or to prepare only the narrow strip where the seed is placed. Alternatives include:
- Attaching rolling baskets or other finishing attachments directly to the primary tillage tool.
- Using planter-mounted row cleaners to clear residue from the seed row just ahead of the planting unit.
- Adopting strip-tillage systems that prepare a narrow band, leaving inter-row areas untouched.
- Deploying vertical tillage tools with less aggressive finishing attachments that size residue without pulverizing the soil.
Key Takeaways
- The ideal tillage system is not universal; it must be adapted to your specific soil type, climate, and residue levels.
- Deep compaction from axle loads over 10 tons causes long-lasting yield loss that cannot be fixed by shallow tillage.
- Diagnosing soil problems like hardpans by digging a soil pit is the most critical first step before investing in any new equipment or practice.
How to Diagnose Hardpans That Limit Root Penetration?
Often, the yield-limiting factor in a field is not a lack of fertility or a problem on the surface, but an invisible barrier lurking just below the topsoil: a hardpan. This is a dense, compacted layer of soil that physically prevents roots from penetrating deeper to access water and nutrients. It can be naturally occurring, but more often it is a “tillage pan” created by years of running plows or discs at the same depth. Before you can fix a hardpan, you must first confirm its presence and depth. Relying solely on a penetrometer can be misleading, as readings are heavily influenced by soil moisture. The most definitive method is an old-fashioned one: digging a soil pit and observing the evidence firsthand.
A soil pit provides undeniable proof. One of the clearest visual indicators of a hardpan is the pattern of root growth. Farmers can identify a compaction layer by observing “J-rooting” or “L-rooting” patterns in their crops. Instead of growing downwards, roots hit the dense layer and are forced to turn and grow horizontally, creating a distinctive “J” or “L” shape. This visual deformation is definitive proof of a root-restricting layer. The process of digging a diagnostic pit during the growing season is straightforward and reveals a wealth of information.
Step-by-Step Soil Pit Diagnostic Procedure
To accurately diagnose soil structure issues, follow this simple procedure. First, dig a pit 3-4 feet deep, perpendicular to the crop rows, during the active growing season when roots are visible. Look for abrupt changes in soil color; compacted layers often appear darker, grayer, or mottled due to poor drainage. Next, use a knife or a sturdy wire flag to test resistance at different depths. A hardpan will require significantly more pressure to penetrate than the looser soil above or below it. Observe the root density changes, as roots will often concentrate in the zone directly above the hardpan. Finally, note the depth and consistency of this layer. Tillage pans created by equipment typically occur at a uniform depth of 8 to 10 inches across the field.
This simple act of digging and observing empowers you to move beyond guesswork. It provides the critical data needed to decide if deep ripping is necessary, and if so, at what precise depth it must be performed to shatter the pan effectively. It is the ultimate diagnostic act that should precede any major change in tillage strategy.
Ultimately, selecting the right tillage system begins not in an equipment catalog, but with a shovel and a keen eye. By diagnosing your soil’s specific limitations—be it a tillage pan, poor aggregate stability, or the legacy of past compaction—you can choose the precise tool from the tillage spectrum to solve the real problem, ensuring your efforts improve both soil health and your bottom line.