High-density success isn’t about plant numbers; it’s about mastering the limiting factors of your specific growing system.
- True optimization demands re-engineering your approach to light as a biological trigger, not just an energy source.
- Precise nutrient balance, like the critical Nitrogen-to-Sulfur ratio, is more impactful than sheer volume of fertilizer.
Recommendation: Shift from broad applications to diagnosing and solving the single, specific bottleneck that is holding back your yield potential.
For experienced growers, the pressure to increase output from a fixed acreage is constant. The standard advice often revolves around simply increasing plant density, a tactic that quickly reveals its limitations. Many conventional farming methods are hitting a productivity ceiling, with research showing that 24-39% of major crop-growing areas are experiencing yield stagnation or collapse. This plateau suggests that simply doing more of the same is no longer a viable strategy for growth.
The common solutions—adjusting row spacing, using generic fertilizer programs, or following standard light cycles—treat the farm as a collection of independent components. But this approach misses the bigger picture. What if the key to unlocking the next level of yield wasn’t in any single input, but in the complex interactions between them all? This is the core of true high-density mastery: viewing your operation not as square footage to be filled, but as a dynamic, three-dimensional system where every element is a controllable variable.
This guide moves beyond basic principles. We will deconstruct the interconnected systems of high-density cultivation, focusing on the precision techniques required to turn your acreage into a hub of volumetric productivity. We’ll explore how to manipulate environmental triggers for biological response, diagnose hidden nutrient bottlenecks that conventional tests miss, and leverage data to make every square inch perform at its peak. This is about transforming your understanding of “density” from a simple measure of space to a sophisticated strategy of control.
For those who prefer a visual introduction, the following video offers a practical look into the structural setup and management of high-density planting for fruit trees, perfectly complementing the strategic concepts discussed in this guide.
To help you navigate these advanced concepts, this article is structured to build your expertise systematically. We will begin by challenging conventional wisdom on spacing and then dive into the high-tech world of hydroponics, before exploring the nuanced control of nutrients, light, and water that defines modern precision agriculture.
Summary: An Advanced Guide to Maximizing Crop Yields with High-Density Planting
- Why Standard Crop Spacing Is Costing You 15% in Yields?
- How to Build a Commercial Hydroponic Setup in a Warehouse?
- Soil vs. Substrate: Which Yields Better Tomatoes in Greenhouses?
- The Fertigation Mistake That Burns Roots Overnight
- How to Tweak LED Spectrums to Accelerate Flowering Stages?
- Why Adding More Nitrogen Won’t Help if Sulfur is Limiting?
- How to Map VRI Zones Based on Soil Water Holding Capacity?
- How to Interpret Soil Tests for Precision Fertilization?
Why Standard Crop Spacing Is Costing You 15% in Yields?
The concept of “optimal spacing” is one of the first lessons in agriculture, yet it’s often based on outdated assumptions that prioritize convenience over maximum biological efficiency. Standard spacing is designed to prevent resource competition in a simplistic, two-dimensional model. However, it fails to account for volumetric productivity—the total yield achievable within a given three-dimensional space. By leaving excessive gaps, conventional layouts waste the most valuable resource in modern farming: light. Uncaptured photons are lost profit.
Moving from standard to High-Density Planting (HDP) or Ultra High-Density Planting (UHDP) is a fundamental paradigm shift. It’s not about crowding plants; it’s about re-engineering the canopy to intercept nearly 100% of available light and converting it into saleable product. This requires a systems-based approach that re-evaluates everything from rootstock selection to trellis design and pruning strategies. The goal is to create a “fruiting wall” or a uniform productive canopy where every leaf is working efficiently.
Case Study: Apple Orchard Transformation with UHDP
Traditional apple orchards often feature fewer than 250 trees per hectare. By transitioning to Ultra High-Density Planting systems, innovative growers are now exceeding 1250 trees per hectare. This strategic intensification does more than just increase plant population by over 33%; it fundamentally changes the orchard’s economics. The compact, uniform structure of UHDP systems is perfectly suited for mechanization, leading to a reported 44% reduction in labor costs for tasks like pruning and harvesting. This demonstrates that rethinking spacing is a gateway to systemic efficiency gains, not just a marginal increase in plant count.
The challenge, of course, is that higher density amplifies mistakes. Nutrient deficiencies, pest pressure, and inadequate air circulation can spread rapidly in a dense environment. Therefore, adopting HDP successfully means you must also commit to a higher level of management, monitoring, and precision control. It’s a high-risk, high-reward strategy that separates proficient growers from elite producers.
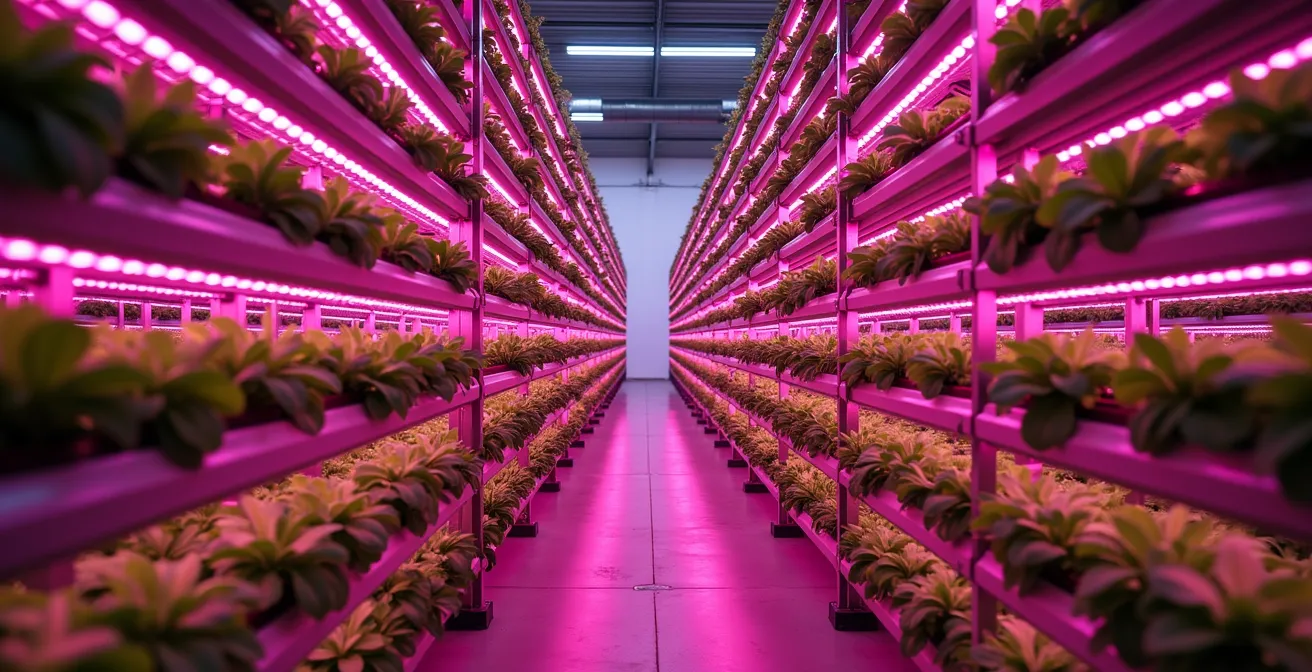
How to Build a Commercial Hydroponic Setup in a Warehouse?
Taking the concept of volumetric productivity to its extreme leads us to commercial hydroponics in a controlled warehouse environment, or vertical farming. Here, the limitation is no longer land area but cubic volume and energy efficiency. Building a successful commercial setup goes far beyond hobbyist kits; it requires meticulous planning of infrastructure, environmental controls, and workflow logistics to be profitable.
The first step is a strategic site selection, ideally an urban location within a 50-mile radius of your target market to slash transportation costs. The structural build-out is capital-intensive, with initial setup costs for vertical racks, LED lighting, and plumbing systems averaging $30-50 per square foot. The most critical system to design is the Mechanical, Electrical, and Plumbing (MEP), as it governs the climate. Advanced operations use dedicated MEP containers to create distinct climate zones within the same warehouse, allowing for the simultaneous cultivation of different crops.

However, the primary operational challenge in a fully enclosed system is energy. Without sunlight, you are entirely reliant on artificial lighting, which is a significant cost. For major retailers, achieving a Global Food Safety Initiative (GFSI) benchmarked certification like SQF or BRC is non-negotiable, adding another layer of operational rigor. This system demands an engineering mindset as much as an agronomic one.
The following table from ATTRA provides a stark comparison of the energy demands, a crucial factor for any grower considering a move to indoor vertical farming. This highlights the critical need for an energy optimization strategy from day one.
| System Type | Energy Use (kWh/kg) | Primary Application |
|---|---|---|
| Traditional Greenhouse | 5.4 | Natural light supplementation |
| Indoor Vertical Farm | 38.8 | Full artificial lighting |
Soil vs. Substrate: Which Yields Better Tomatoes in Greenhouses?
In controlled environment agriculture, the choice between growing in soil or a soilless substrate (like rockwool, coco coir, or perlite) is a pivotal decision that impacts yield, resource management, and operational complexity. While high-quality soil can produce excellent results, substrates offer a level of control and precision that is often necessary to maximize the potential of a high-density system. Soil is a complex, living ecosystem with inherent variability in texture, pH, and microbial life. Substrates, on the other hand, are inert and sterile, providing a blank slate.
This sterility is a key advantage. It allows the grower to deliver a precisely formulated nutrient solution directly to the root zone without interference from existing soil chemistry. This eliminates variables like nutrient lock-up and competition from weeds or soil-borne pathogens, enabling a more direct and efficient path from input to plant uptake. This high degree of control is what allows soilless systems to consistently push yield boundaries. For a high-value crop like tomatoes, this precision can mean the difference between profit and loss.
Among soilless methods, aeroponics represents the pinnacle of precision, delivering nutrient-rich mist directly to suspended roots. This approach maximizes oxygenation, a critical factor for vigorous root development and nutrient absorption. As an authority in the field notes, the gains can be substantial even when compared to other soilless techniques. According to Agrotonomy Corporation’s commercial research:
Aeroponics delivers on average a 35% increase in crop yield and 40% water savings in comparison to conventional hydroponics.
– Agrotonomy Corporation, Commercial Tower Farm Research
Ultimately, the choice is a trade-off. Soil is more forgiving and requires less technical expertise in nutrient management. Substrates, particularly advanced systems like aeroponics, demand a deep understanding of plant physiology and water chemistry but offer unparalleled potential for yield optimization. For the experienced grower aiming for maximum output, mastering substrate-based cultivation is an essential skill.
The Fertigation Mistake That Burns Roots Overnight
In high-density and hydroponic systems, fertigation is the lifeblood of the operation. It’s also one of the greatest risks. A small miscalculation in the nutrient solution can cause catastrophic damage, like root burn, almost overnight. One of the most common and devastating mistakes isn’t just over-fertilization, but a failure to understand basic chemistry—specifically, nutrient antagonism and precipitation. Growers often learn this lesson the hard way.
A classic example occurs when mixing concentrated stock solutions. Many operations use separate “A” and “B” tanks because certain concentrated nutrients are incompatible. For instance, if you mix a concentrated calcium source (often in Tank A) with a concentrated sulfate or phosphate source (often in Tank B), they will react to form calcium sulfate (gypsum) or calcium phosphate. This precipitate is an insoluble solid that falls out of the solution.
The consequences are twofold and immediate. First, the newly formed solids will clog your irrigation system’s emitters, leading to uneven water distribution and starving some plants while flooding others. Second, and more insidiously, the nutrient solution delivered to the plants is now critically imbalanced. The plants are deprived of essential calcium, sulfur, and phosphorus, while the relative concentration of other nutrients like nitrogen spikes. This sudden imbalance can manifest as symptoms of root burn or toxicity within 24 hours, even though the total Electrical Conductivity (EC) might seem correct. The grower mistakenly thinks they’ve over-fertilized, when the real problem was an improper mixing protocol.
This highlights a core principle of precision agriculture: it’s not just about what you put in, but how and when. Preventing these failures requires strict protocols, such as always using separate stock tanks for incompatible elements and adding them to the main reservoir sequentially, allowing each to fully dissolve before adding the next. Daily monitoring of source water alkalinity is also critical, as high bicarbonate levels can further disrupt nutrient availability.
How to Tweak LED Spectrums to Accelerate Flowering Stages?
In a fully controlled environment, light is no longer just a source of energy for photosynthesis; it’s a powerful tool for biological signaling. By precisely manipulating the light spectrum, growers can directly influence plant morphology, development, and timing. This is particularly crucial for accelerating the transition to the flowering stage, a key factor in shortening crop cycles and increasing annual turnover. The mechanism behind this control lies in a group of photoreceptors in plants called phytochromes.
Phytochromes act like a biological light switch, existing in two forms: Pr (absorbs red light) and Pfr (absorbs far-red light). The ratio of these two forms tells the plant about its light environment and influences key developmental processes, including germination and flowering. During the day, abundant red light (around 660nm) from the sun or LEDs converts Pr to Pfr. At night, Pfr slowly reverts back to Pr. A high Pfr/Pr ratio generally inhibits flowering in short-day plants and promotes it in long-day plants.

Experienced growers can hack this system. By providing a brief “end-of-day” treatment with far-red light (around 730nm), they can rapidly convert Pfr back to Pr, tricking the plant into perceiving that the night has started earlier and is longer than it actually is. This can trigger a faster flowering response in short-day plants like cannabis or chrysanthemums. Conversely, blue light (around 450nm) is critical during the vegetative stage to promote compact, sturdy growth and control stomatal opening, improving water use efficiency.
The table below breaks down the primary roles of these key wavelengths, providing a practical guide for applying spectrum science.
This level of control, outlined in the table from Mars Hydro, allows growers to steer their crops with incredible precision, a key advantage in competitive markets.
| Wavelength | Effect | Application Timing |
|---|---|---|
| 660nm (Red) | Peak photosynthesis, Pfr formation | Throughout growth |
| 730nm (Far-Red) | Pfr to Pr conversion, flowering trigger | End-of-day treatment |
| 450nm (Blue) | Compact growth, stomatal control | Vegetative stage |
Why Adding More Nitrogen Won’t Help if Sulfur is Limiting?
The temptation to boost growth by simply adding more nitrogen (N) is a common reflex in farming. Nitrogen is a primary component of chlorophyll and amino acids, and its effects on vegetative growth are highly visible. However, this approach often leads to diminishing returns or even negative consequences, all because of a 19th-century principle known as Liebig’s Law of the Minimum. This law states that growth is dictated not by the total amount of resources available, but by the scarcest resource—the “limiting factor.”
In modern, high-yield agriculture, one of the most frequently overlooked limiting factors is Sulfur (S). Nitrogen and sulfur are partners in protein synthesis. While nitrogen forms the basic structure of amino acids, sulfur is essential for creating two critical ones: methionine and cysteine. Without adequate sulfur, the plant cannot complete the process of building proteins, no matter how much nitrogen is available. The USDA Agricultural Research Service puts it succinctly:
Nitrogen is useless for building proteins without adequate Sulfur, which is essential for forming the amino acids methionine and cysteine.
– USDA Agricultural Research Service, Nutrient Interaction Studies
When sulfur is the limiting factor, adding more nitrogen is not only wasteful but also detrimental. The excess nitrogen that cannot be converted into proteins accumulates in the plant as non-protein nitrogen compounds, like nitrates. This can reduce the crop’s nutritional value, decrease its storage life, and even make it more attractive to certain pests. The ideal Nitrogen-to-Sulfur (N:S) ratio for most crops is around 15:1. Deviating significantly from this ratio creates a systemic bottleneck. Identifying the deficiency is key: nitrogen deficiency typically appears as yellowing (chlorosis) on older, lower leaves because it’s a mobile nutrient. Sulfur, being immobile, shows up as chlorosis on the newest, upper leaves.
This relationship is a perfect illustration of the precision mindset. Maximum yield isn’t achieved by flooding the system with one input, but by ensuring all essential inputs are present in the correct proportions. It’s about balance, not brute force.
How to Map VRI Zones Based on Soil Water Holding Capacity?
While hydroponics offers the ultimate control, the principles of precision agriculture can be powerfully applied to traditional field operations. Variable Rate Irrigation (VRI) is a prime example. Instead of applying a uniform amount of water across an entire field, VRI uses technology to deliver precise amounts of water to different zones based on their specific needs. The most effective way to define these zones is by mapping the Soil Water Holding Capacity (SWHC), which varies with soil texture.
A field that looks uniform on the surface often has significant underlying variability. Sandy soils hold less water than clay or loam soils. Applying the same amount of water everywhere means you are likely overwatering the clay sections (risking root disease and runoff) and under-watering the sandy sections (causing crop stress). VRI solves this by creating a prescription map that tells the irrigation system to apply more water to low-SWHC zones and less to high-SWHC zones.
Creating this map is a data-driven process. It begins with a comprehensive field survey using sensors like an EM38 or Veris to measure soil electrical conductivity (EC). High EC readings often correlate with higher clay content and thus higher SWHC, while low EC correlates with sand. This initial map is then refined by overlaying other data layers, such as historical yield maps from the past 3-5 seasons and satellite NDVI imagery, which shows variations in plant biomass. The convergence of these datasets allows for the delineation of 3-5 distinct management zones with clear differences in water needs.
The final step is to write a VRI prescription, adjusting application rates by as much as +/-30% per zone compared to a uniform rate. Validating these zones with in-ground soil moisture sensors during the first season is critical for fine-tuning the prescription. This methodical approach ensures that water, a precious and often costly resource, is used with maximum efficiency.
Action Plan: Creating VRI Management Zones
- Data Acquisition: Conduct comprehensive Electrical Conductivity (EC) mapping across the field and correlate the values with physical soil texture samples (sand, silt, clay).
- Historical Analysis: Overlay historical yield maps and multi-season satellite NDVI data to identify consistent patterns of high and low biomass.
- Zone Delineation: Synthesize all data layers to create a composite map with 3 to 5 distinct management zones based on water holding capacity.
- Prescription Writing: Develop a VRI prescription that adjusts water application rates for each zone, often varying by +/-30% from the field average.
- Validation and Refinement: Install soil moisture sensors in each zone to validate the prescription’s performance during the first growing season and make necessary adjustments.
Key Takeaways
- Mastering high-density planting requires a shift from a 2D (acreage) to a 3D (volumetric) mindset, optimizing light interception and airflow.
- In controlled environments, light spectrum is a biological trigger; far-red light (730nm) can be used to accelerate flowering stages.
- Nutrient management is about balance, not volume. A limiting factor, like insufficient sulfur, will negate the effects of excess nitrogen due to Liebig’s Law of the Minimum.
How to Interpret Soil Tests for Precision Fertilization?
All precision agriculture starts with data, and for soil-based systems, the soil test is the foundational dataset. However, simply getting a report is not enough; knowing how to interpret it is what enables true precision fertilization. An experienced grower must understand that different tests answer different questions, and using the right test for the right purpose is critical for making cost-effective and agronomically sound decisions.
There are three primary types of analysis. The Standard Soil Test measures the total nutrient reserves in your soil, providing a long-term view of its fertility. It’s best used for annual planning and making decisions about major amendments like lime or phosphorus. The Saturated Paste Test, in contrast, measures only the nutrients that are currently dissolved in the soil solution and are immediately available to the plant. This is an in-season tool, perfect for diagnosing an acute problem or making a quick fertigation adjustment. Finally, Tissue Analysis measures what the plant has actually taken up, providing the ultimate verification of nutrient availability and identifying “hidden” deficiencies that other tests might miss.
Case Study: BCSR-Driven Yield Increase in Peanut Production
A powerful interpretation method is the Base Cation Saturation Ratio (BCSR), which focuses on achieving an ideal balance between key cations (Calcium, Magnesium, Potassium, Hydrogen). A commercial peanut operation that moved beyond simply looking at nutrient levels and instead implemented a fertilization program based on achieving optimal BCSR saw dramatic results. By correcting these ratios, the operation achieved yields of 3,800 pounds per acre, representing a 20% production increase in fields with properly balanced soils. This shows that interpretation and balance are more powerful than simple application.
This table summarizes the application of each test type, helping you choose the right tool for the job.
As this comparative table sourced from Our World in Data shows, using these tests in concert provides a complete picture of soil health and plant needs.
| Test Type | What It Measures | Best Use Case |
|---|---|---|
| Standard Soil Test | Total nutrient reserves | Annual planning, long-term amendments |
| Saturated Paste Test | Currently available nutrients | In-season adjustments, problem diagnosis |
| Tissue Analysis | Actual plant uptake | Verify nutrient availability, hidden deficiencies |
Ultimately, a soil test is a roadmap. Learning to read it correctly allows you to move from guessing to knowing, applying exactly what the crop needs, when it needs it. This is the final and most crucial step in closing the loop on a precision fertilization strategy.
Applying these advanced techniques requires a commitment to continuous learning and data-driven decision-making. To translate this knowledge into tangible results, the next logical step is to implement a pilot program on a small section of your operation to test and refine these strategies in your unique environment.
Frequently Asked Questions on How to Master High-Density Planting for Maximum Output?
What is the ideal N:S ratio for optimal crop growth?
Most crops perform best with a Nitrogen-to-Sulfur (N:S) ratio around 15:1. This balance is critical because sulfur is required to form key amino acids, allowing the plant to effectively convert nitrogen into protein. Canola is one crop that is particularly sensitive and requires this precise ratio for optimal oil production.
How can I identify sulfur deficiency versus nitrogen deficiency?
The key is to observe where the chlorosis (yellowing) appears on the plant. Nitrogen is a mobile nutrient, so the plant will move it from older to newer growth; therefore, nitrogen deficiency shows up on the older, lower leaves. Sulfur is immobile within the plant, so a deficiency will appear as yellowing on the new, upper leaves.
Why does excess nitrogen without sulfur reduce crop quality?
When sulfur is the limiting factor, the plant cannot synthesize complete proteins even with abundant nitrogen. This excess nitrogen accumulates as non-protein nitrogen compounds (like nitrates). This accumulation not only reduces the nutritional value and storage quality of the crop but can also make it more susceptible to certain pests and diseases.